Product information:
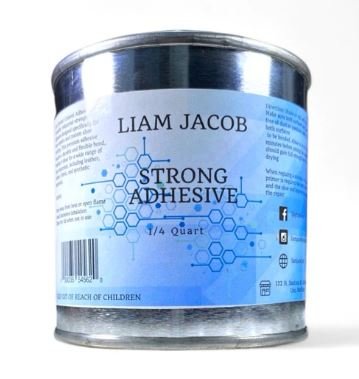
A Polychloropene/MMA grafted adhesives that provides better adhesion and cohesion strength than contact cement. Used for bonding PVC, PU, Leather, Faux Leather, Rubber, EVA, Nylon, TPR. When regluing a sole to a shoe, using a primer is required the bond between the sole and the shoe and improve the longevity of the repair. Here are step-by-step instructions on how to re-glue a sole to a shoe, including the use of a primer.
Steps:
Prepare your workspace: Choose a clean, well-ventilated area to work in. Lay down some newspaper or a drop cloth to protect your work surface.
Clean the shoe: Use a clean cloth to wipe the shoe and sole surfaces clean. Remove any dirt, dust, or loose debris.
Roughen the surfaces: Using sandpaper, lightly roughen both the shoe’s sole and the detached sole. This will help the adhesive bond better. Make sure to concentrate on areas where the sole was detached. Apply the primer: Apply the primer to both the shoe sole and the detached sole. Follow the manufacturer’s instructions for the specific primer you’re using. Some primers may require you to apply a thin layer and let it dry for a few minutes before proceeding.
Apply the adhesive: After the primer has dried (if required), apply a thin, even layer of shoe sole adhesive to both the shoe sole and the detached sole. Be careful not to use too much glue, as it can squeeze out when you press the sole back in place. Press the sole back in place: Carefully align the sole with the shoe, ensuring it is positioned correctly. Press the sole firmly onto the shoe, making sure the adhesive spreads evenly.
Secure with clamps or weights: To ensure a strong bond, use clamps or place weights on top of the sole to keep it in place while the adhesive dries. Follow the adhesive manufacturer’s recommended drying time, which is typically at least 24 hours.
Trim excess glue: After the adhesive has dried, use a utility knife or scissors to trim away any excess glue that may have squeezed out from the edges.
Inspect the bond: Check the sole to ensure it is securely attached. If there are any weak spots or areas that didn’t bond properly, you may need to reapply adhesive to those areas and repeat the process.
Clean up: Clean your tools and dispose of any adhesive waste properly.
Test the shoe: After the sole has dried and you’ve cleaned up, try on the shoe to make sure the sole is securely attached and comfortable to wear.

Reviews
There are no reviews yet.